More Peaceful Poppies

Hello again!

I’m back today with my final three makes from my recent product class using the peaceful poppy suite.  Again these vary in difficulty but as always I feel that anyone could make these cards with the right equipment and guidance.  I generally craft with the ladies in my class so really anyone and everyone can join in the fun!

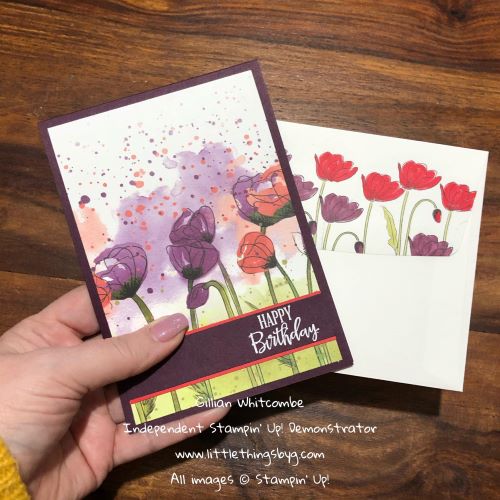
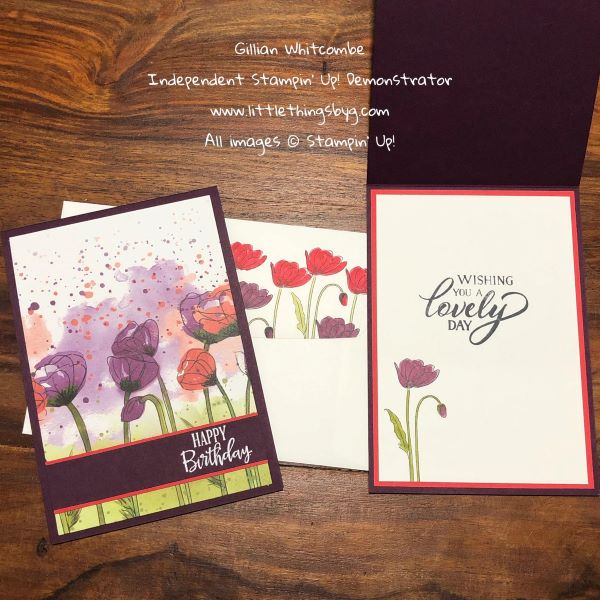
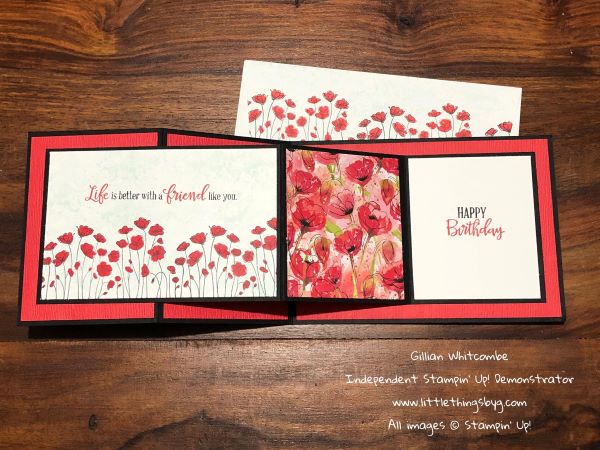
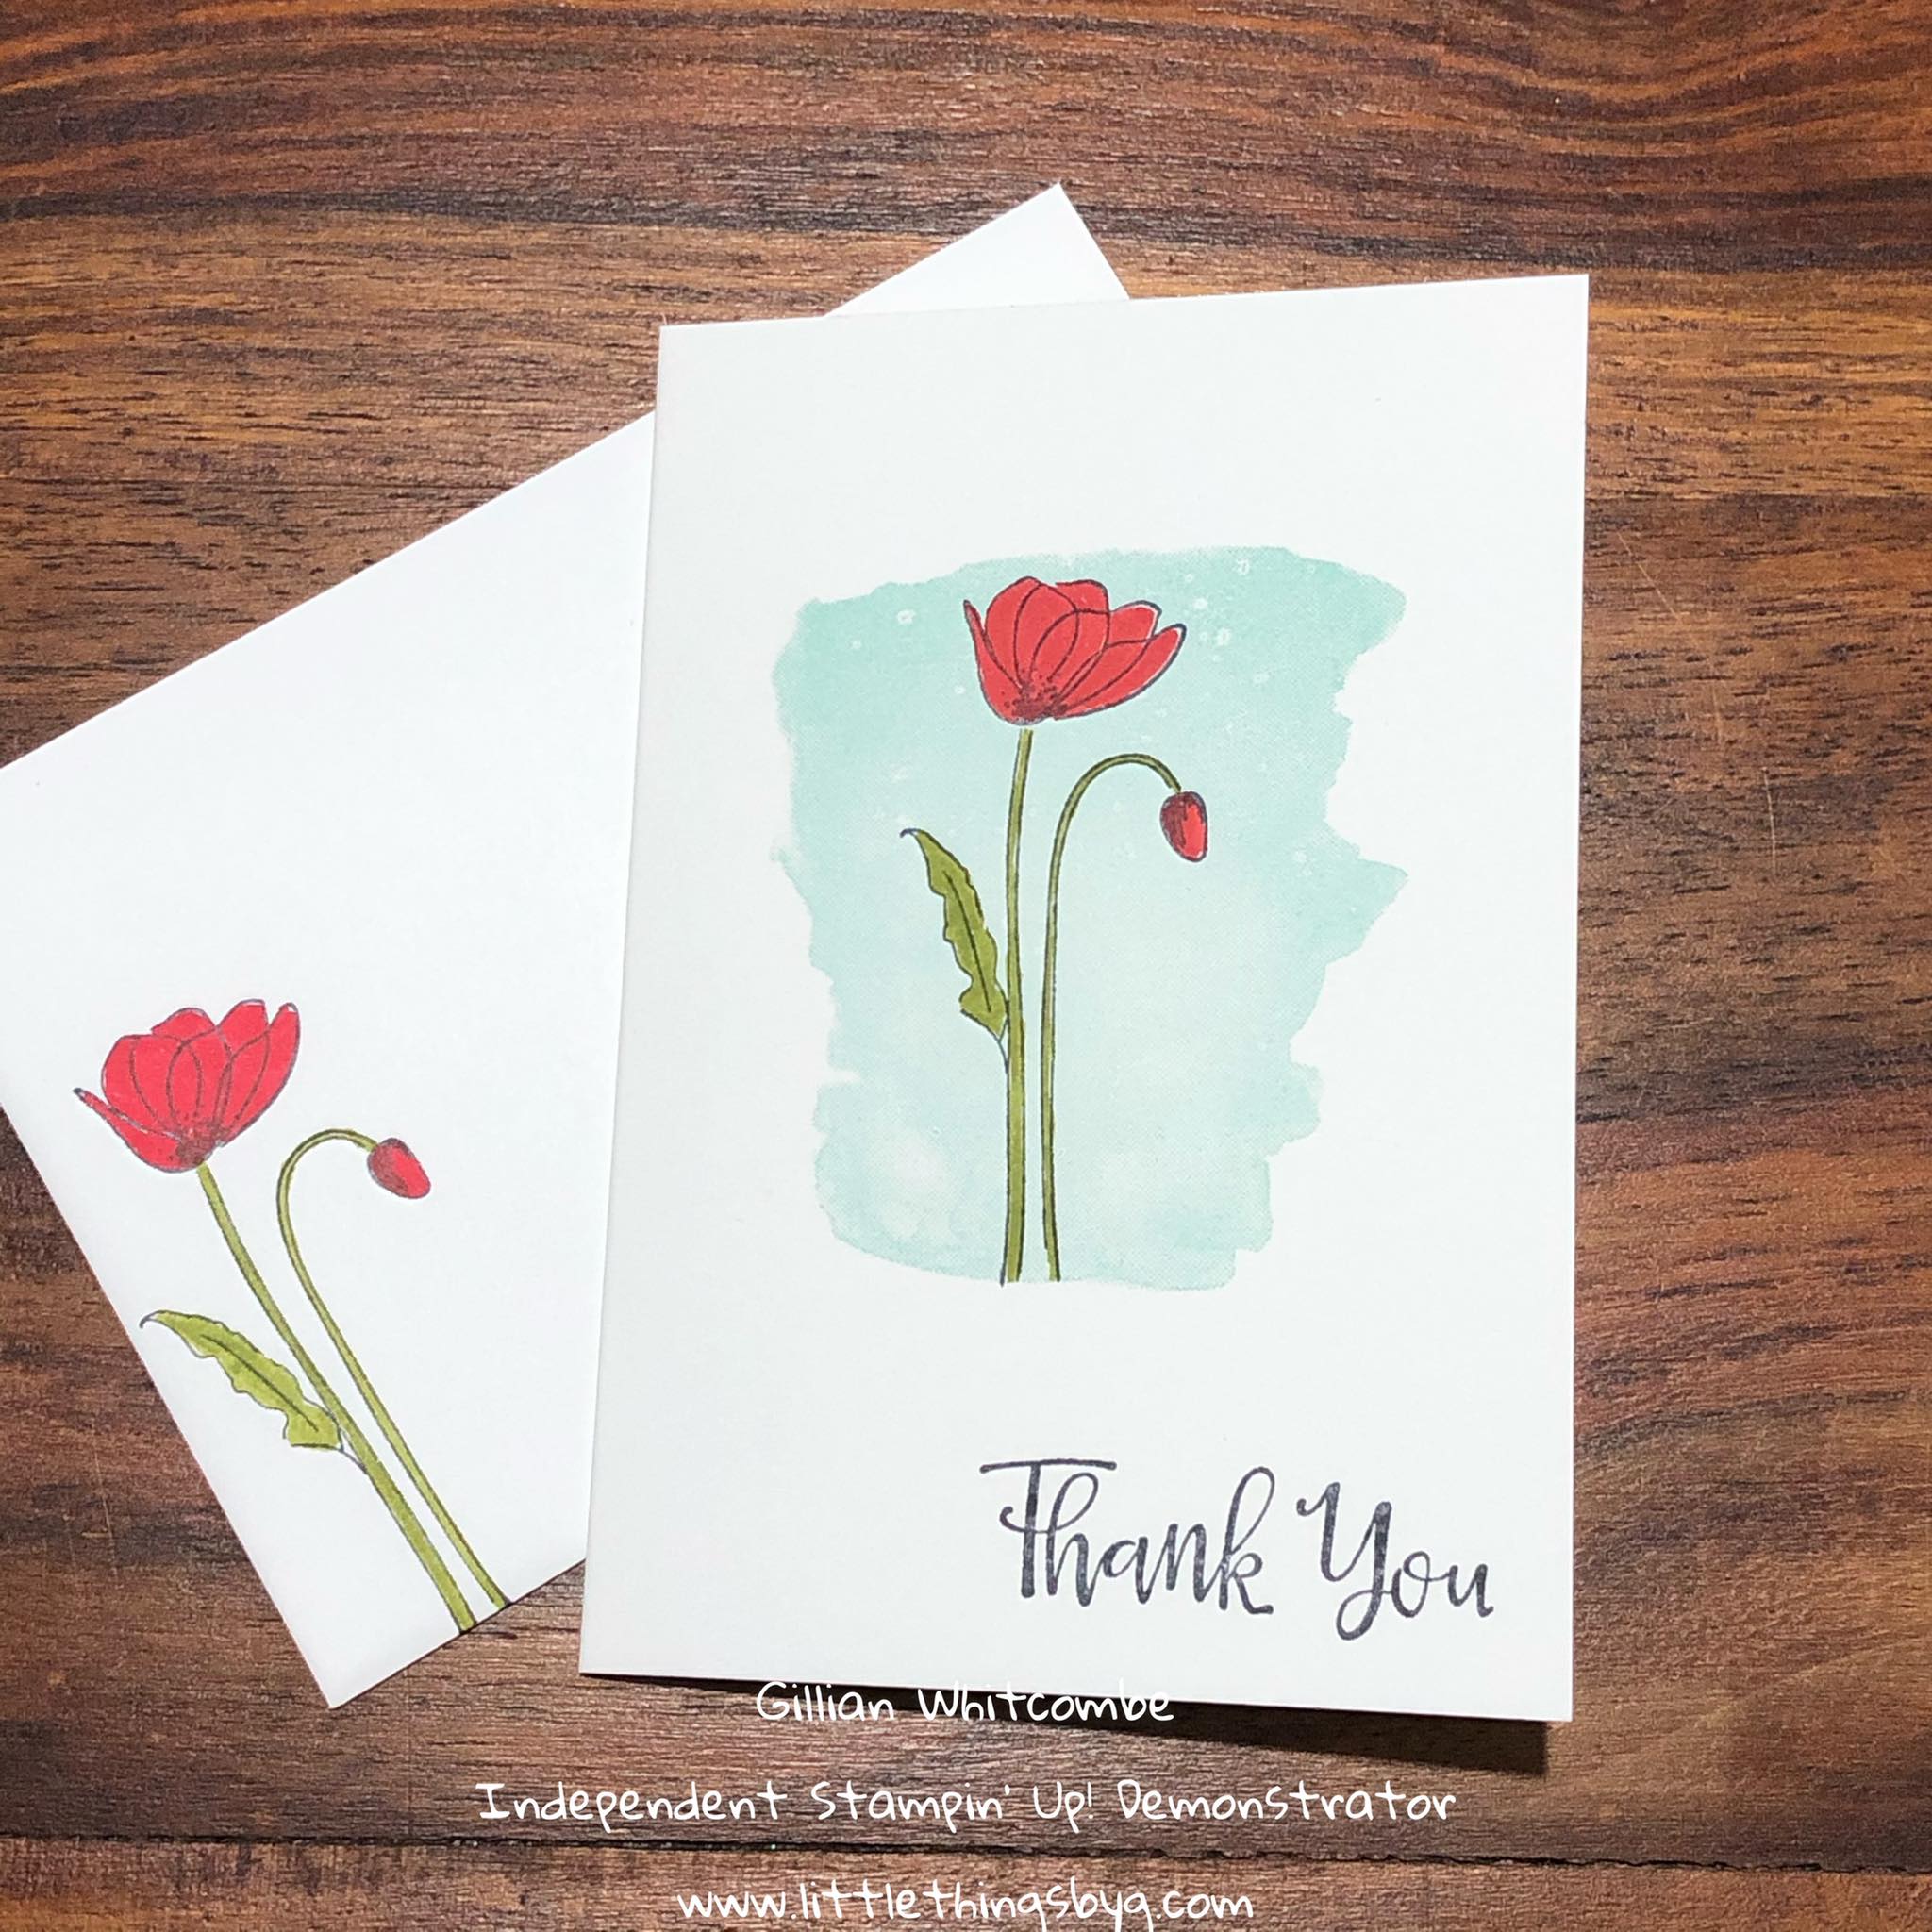
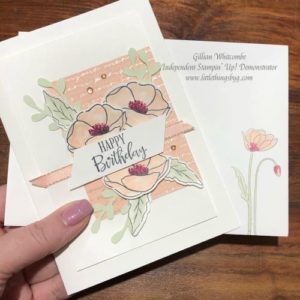
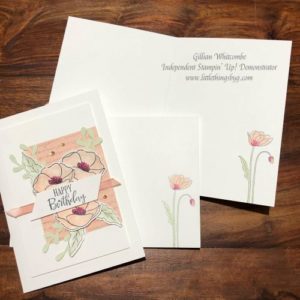
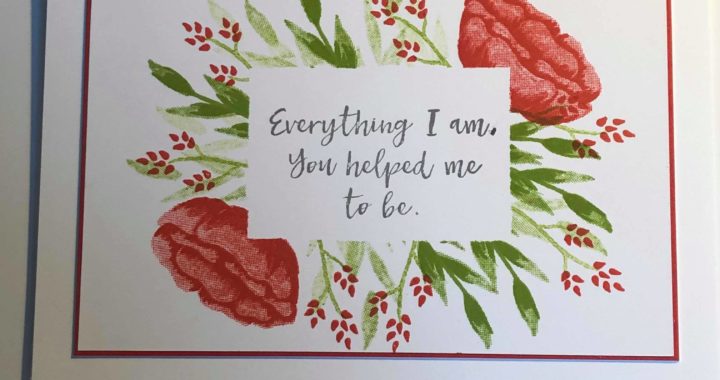
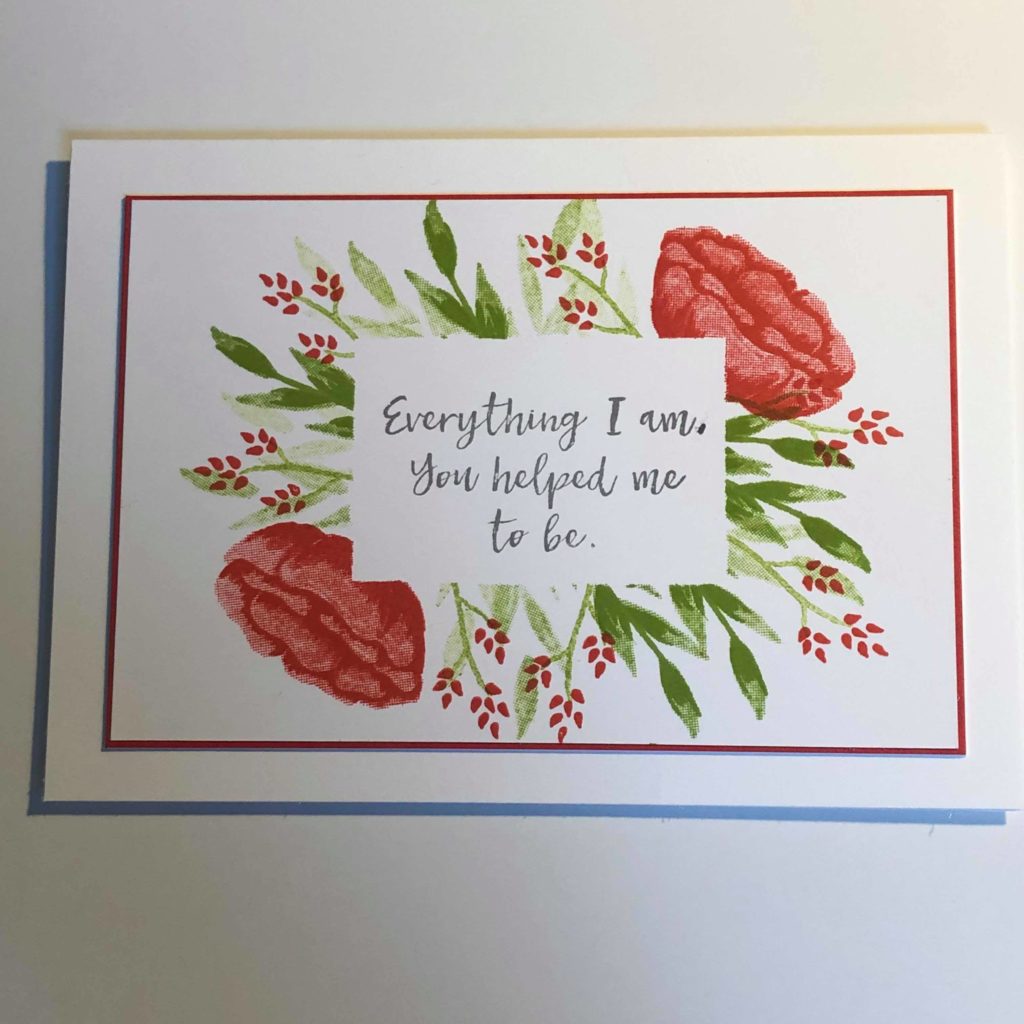
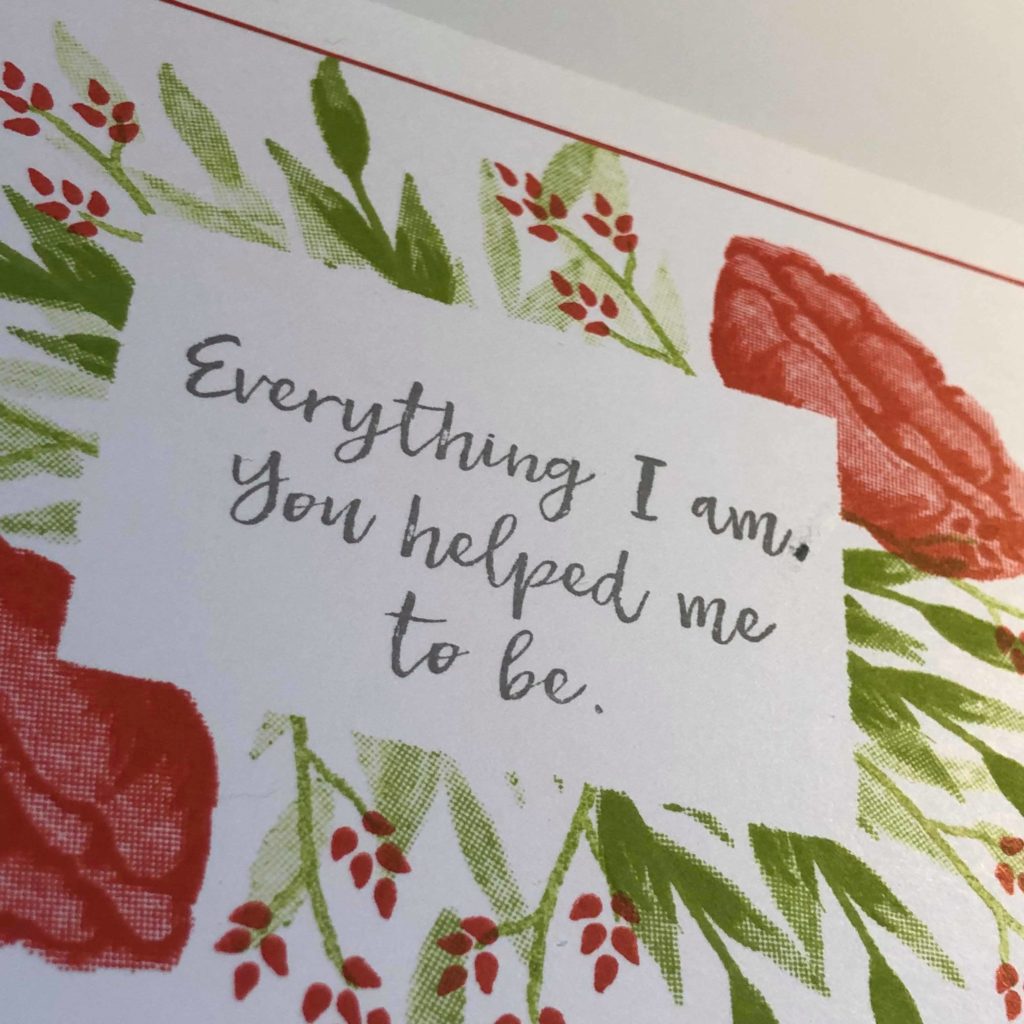
The first card below features the absolutely stunning peaceful poppies designer series paper.

I used a blackberry bliss base bringing the poppy parade from the flowers inside the card by adding a poppy parade mat.  Once again I prettied up the envelope.  Because lets face it when this envelope lands on your doormat you know you’ve got something special to open!

The sentiment on the front of the card is from the Peaceful Moments stamp set.  The one inside the card is from the Forever lovely stamp set which can be found on page 81 of the annual catalogue.

You get two sheets of this paper in the pack of peaceful poppies designer series paper meaning you could make 12 cards like this from those two sheets alone! And it is gorgeous!

Fancy Fold

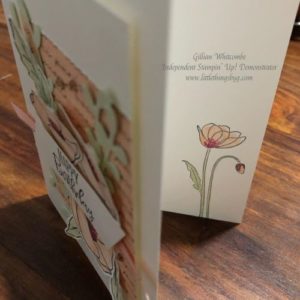
This next card is a fancy fold however it is really quite simple to make but really stands out from the other ‘ordinary’ cards on the mantle! For this card I used a basic black base.  This is layered up using poppy parade.  But not just plain poppy parade I ran each of the pieces through my big shot using the subtle embossing folder.  I love the added texture this brings to the card.  I also used a small piece of designer series paper in the inside of the card.  The main image is stamped in memento black ink and coloured with the poppy parade stampin’ blends.  Next I used the markers to colour the stamped image in basic black and poppy parade.   Finally the background stamp is simply stamped randomly in pool party (second generation – meaning ink once, stamp on scrap and then on your project).

I reproduced the image ono the front of the card on the flap of the envelope for added interest.

The photograph below shows how the card looks fully open… pretty?
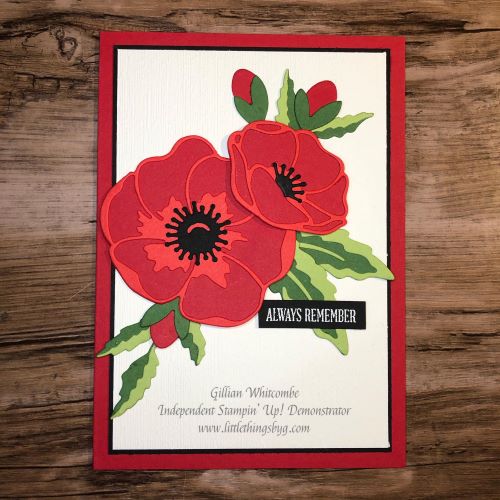
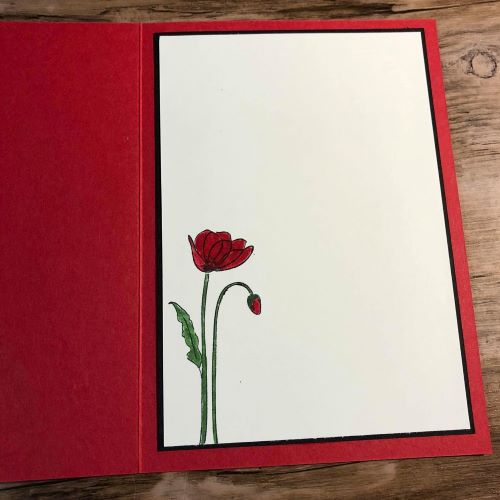
And now for the WOW

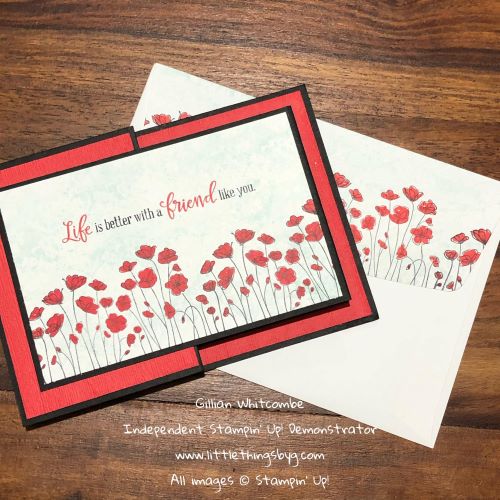
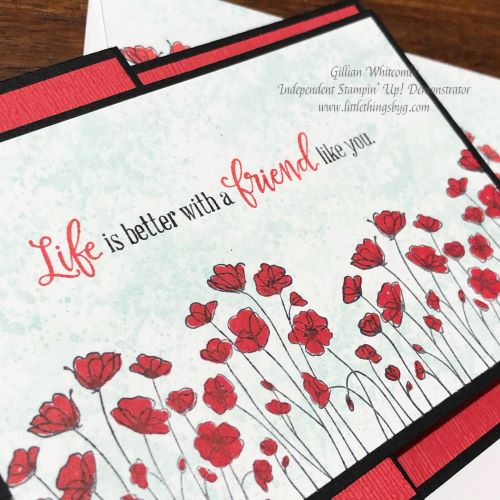
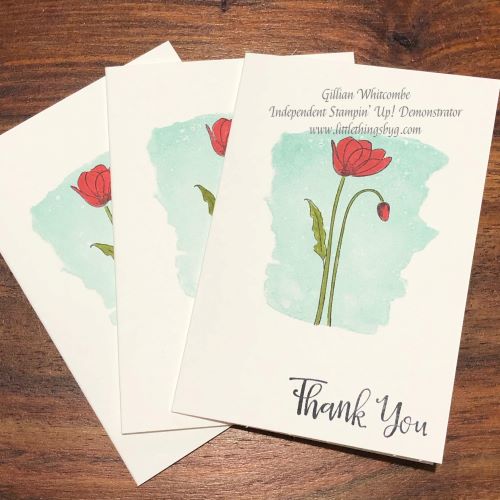
For me the dies in the peaceful moments bundle really bring a wow.  This isn’t a fancy fold, it doesn’t have lots of embellishment; it really is simply card.  But where the wow comes in is when you cut that card using these gorgeous dies.  And can I just say they cut like butter!

I used poppy parade, real red, basic black, garden green and pear pizzazz card stock to make the flowers on this card.   I used white embossing powder to heat emboss the sentiment.  Next I embossed the front panel once gain with the subtle embossing folder.  This really is my go to for transforming card stock and adding texture in the easiest way possible.

Everyone in the class loved this card and its definitely worth the effort of cutting and sticking.  My husband picked this as his favourite card; as an ex military man poppies are close to his heart!

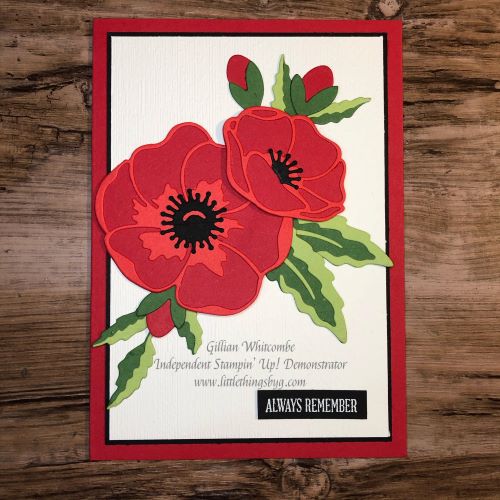
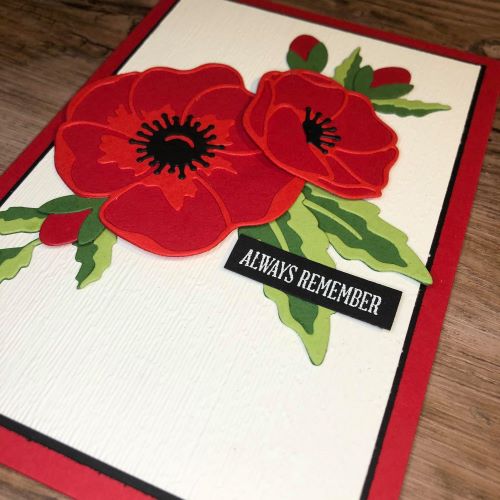
I made two versions; one with the sentiment in the bottom right corner and one with it slightly higher.  Personally I prefer the slightly higher one but I’ve had very mixed feedback from customers.  Which do you prefer – leave me a comment below to let me know!

Anyway that’s all the cards for today, if you have any questions or would like any more details on any of the cards featured please just let me know and I would be more than happy to help out!

As always the supplies are listed below and remember for every £45 spend you get a free product from the Sale-a-bration catalogue!!

Lots of love

Gillian  x

Product List

Paper Trimmer

£23.00

Paper Snips

£9.25

Clear Block I

£11.25

Peaceful Poppies Suite

Hello again from my super freezing craft studio in Northern Ireland!  The weather is just so cold right now and snow is expected so I’m trying to focus on the warmth to come and the beautiful colours that will start appearing in my garden over the coming months!

Poppies are my favourite!

One of my favourite flowers is the poppy, not just the traditional large red ones, I love the little mini ones that grows in clumps of colour along the roadsides near where I live.  They are such beautiful cheerful plants!  They also hold a special place in my heart  for their significance to many in that they are the flower of remembrance, and although in the UK Remembrance Day is on 11th November the sight of them always causes me to pause.

Last weekend I held my monthly product based class and this month I went with the painted poppies bundle, although I did also bring in the poppy moments as it has so many great sentiments never mind the fabulous dies!  The cards were suitable for beginner crafters, casual crafters and a few for avid crafters so there was literally something to suit everyone.

For this class I produced six cards, five were my own design and one was cased from one of our Artisan designers, Narelle Furrugia with a few minor alterations.  This is my version of her beautiful card.


Simple Stampin’

The next card I am going to share with you is really one of the simplest, quickest cards to make – EVER!  I used one of our whisper white note cards so I didn’t even have to cut any card!  The background for this card is from Shared what you love stampset which can be found in the annual catalogue.  I stamped the background in pool party.  I then stamped the poppy image in memento black ink and coloured it using the stampin’ write markers in poppy parade and old olive.  The sentiment is from Poppy Moments and is also stamped in black memento.  I prettied up the envelope to finish off, and seriously this literally took a couple of minutes to complete!  Perfect if you need a pile of cards in a hurry!

Watercolour wash

For the last card that I’m going to share with you today I again used a notecard along with a blackberry bliss mat.  For the image I used watercolour paper.  To achieve this look I spritzed the water colour paper first.  Using reinkers in poppy parade and blackberry bliss I then did a wash of colour using an aqua painter.  You have to leave your OCD at the door when playing with ink and water as you can never control what is going to happen!  As you can see each of the three cards I did are different, you will never get two the same!

I dried the water colour paper using my heat tool and manipulated it to get it as flat as possible.  Using my stamparatus I then stamped the poppies (make sure you give time for the ink to transfer to the watercolour paper).  I find using the stamparatus by far the best tool for stamping on the uneven texture of water colour paper.

I finished this card off with some linen thread and prettied up the envelope.  Really once you get over the fear of no control these are quite quick to produce as well and have a very arty look!


What’s your favourite?

I’ve shared three of the cards today, all totally different; which is your favourite? I’d love to know! Be sure to check back in a few days and I’ll be showcasing the rest of the cards we made at the weekend!  Don’t forget to leave me a hello so I know you’ve been by!


Remember that Sale-a-bration is currently ongoing so if you decide to buy the Peaceful poppies bundle for £48.50 you get to choose a free gift from the Sale-a-bration catalogue! You get one free gift selection for every £45 spend.  Click any of the product buttons below to head straight over to my shop!  Or for details of how to join and get the best offer ever click the join now image!

Happy crafting, until next time!

Gillian x

(all images on this blog are (c) 2020 Stampin’ Up!)


Product List

Sprig Punch

£17.00

Aqua Painters

£16.00

Paper Trimmer

£23.00

Paper Snips

£9.25

Linen Thread

£4.75

Clear Block I

£11.25


Wrapped in Plaid

If you haven’t seen the new Christmas Catalogue from Stampin’ Up! yet you are missing out!  There are so many fabulous product suites to choose from there is sure to be something for everyone!

Of course as always they are nearly all my favourites but this week I’m focusing on the wrapped in plaid suite.  Of course you don’t have to get the whole suite but with so much gorgeousness available with one little order code it would be rude not to!

Wrapped in Plaid Suite

This suite features more traditional colours for Christmas utilising cherry cobbler, shaded spruce, gold, night of navy and whisper white.  The designer series paper comes in a pack of 48 6″x6″ double sided sheets, one side of which has gold foil accents in tartan patterns.  The reverse features various designs including stockings, reindeers, Christmas trees, pine cones and more!

This suite is perfect for any level crafter.  With a fabulous punch to co ordinate with the photopolymer stamp set making it a dawdle to cut out those cute Christmas trees.  Of course the punch works equally well with just the designer paper and is a great way to use up all those scraps we crafters tend to hoard – please don’t say I’m alone in this!

To finish off this wonderful collection we have shaded spruce ribbon with a wonderful gold stripe, magical jingle bells in cherry cobbler, shaded spruce and gold and the cutest mini pizza boxes in luxurious gold foil!

Projects

This weekend sees the first of my Christmas Project class days and you’ve guessed it – we are playing with plaid!  I don’t want to share all the projects and ruin the surprise for those attending.  However I have shared two of the cards we are making below.…

For this simple card I used one of our standard sized whisper white notecards.  The designer series paper layer is 2 3/4″ x 3 5/8″ (approx. 7cm x 9.3cm) and the whisper white is 2 5/8″ x 3 1/2″ (approx. 6.5cm x 8.8cm)

I simply centred the punch on the piece of whisper white and added approx. 2.5″ (13cm) of shaded spruce ribbon to the top using my Stampin’ Stapler (sorry its retired now but any mini stapler will do the trick).  The sentiment is from Itty Bitty  Christmas and was inked in Golden Glitz ink.  I then adhered the paper to the notecard using tombow multi purpose adhesive.  Next I added the whisper white negative frame using dimensionals.  And there you have it a really quick and simple card which you can literally make in minutes making it perfect for stampin’ stacks!

The cost of the notecards and envelopes come in at only £6.50 for 20 – bargain!


The second card is more or less exactly the same.  I used a different designer series paper pattern and stamped the sentiment in Shaded Spruce for this one!

There will be four different designs at the class this weekend, plus a gift box that the cards fit into which also happens to fit a tie, or pair of socks or gloves.  We’ll be making some tags as well but I’ll share them next week after the class.

I really do love this suite of products, it is so hard to put it down and you are sure to see it featured here again many times before Christmas so please check back for more inspiration.

Below you will find a full list of the products that were used to make these cards and if you haven’t already got a Stampin’ Up! Demonstrator I’d love to be yours.  You can purchase any of the items in my online shop simply by clicking the link and the best part is I’m open 24/7!


That’s it from me for now but I’ll be back soon with some more crafty inspiration for you, until then;

Happy crafting!!


Love Gillian


Product List

Paper Snips

£9.25

Incredible like you simply stamped

Hello!

It’s been rather a long time since I was last on here, it was one thing after another, after another and before you know it six months have passed.  At that point I decided to revamp my blog with help from the lovely Louise Sims who has created the new look that you see now.  My little sister who is super creative and a graphic designer in real life created my new simple branding and I love it.  If you are looking to relaunch or just revive your own website I really couldn’t recommend Louise highly enough.  Check out her website at http://louisesims.co.uk/

Louise finished the work a couple of months ago but I have been putting off my comeback with one excuse or another and really it was just a fear thing.  I’m not very technically minded, although I am trying to improve but I kept telling myself I couldn’t remember how to do this, or that, or the other.  Recently I’ve realised (following a quick swift in the backside) that I needed to get back and I can continue to learn and develop as I go along.

Surely it’s not just me?

Does that ever happen to you – you want to do something, you know you should and you can but that little voice tells you that you can’t or you will fail and the little task suddenly becomes a huge mountain.  The ladies that come to my classes regularly tell me that they can’t possibly make the card I’ve designed for the day.  But guess what; they can and they do, they learn and follow the  instructions so that by the end of the class they all have a perfectly hand crafted card (or three) to take home with them.

For me however the hardest thing is actually stripping it all back to basics and doing the simple stamping that Stampin’ Up! is trying to promote at the minute.  Ask me to come up with something complicated or different – no problem…. but simple seems to stump me, for whatever reason.  So this week I decided enough was enough we were going to do at least one simple stamping card at class and I was going to do at least one blog post!  Well if you’re reading this then I’m delighted to say that I have achieved both!

Anyway if you are still with me I have a card to share!


Now this may not look like a simple card but trust me it is!  I made a little mask from a piece of copy paper and used low tack adhesive to stick it to the centre of the card.  I then used the Incredible Like You  stamp set to create the image.  I used Poppy Parade and Granny Apple Greenwith Basic Gray for the sentiment.

Tip

Quick tip to minimise the discolouration of polymer stamps, especially when using bright colours like Poppy Parade, ink up with versa mark before the colour.  There will still be some staining but it does help minimise it.

This beautiful stamp set is one of our two step stamps and it creates this beautifully tonal image so simply!

Once I had stamped the flowers and the foliage I simply removed the mask with care, made sure there was no adhesive remaining and then stamped my sentiment.  And this particular sentiment is so beautiful and you can find it in Another Wonderful Year stamp set.  I very nearly overlooked this set and it’s a new addition to my Stampin’ library but it’s a great all round set.  You can find it on page 21 of the Annual Catalogue or click on the link to go straight to the shop!

Here’s a close up of that gorgeous sentiment…


If you fancy having a go at making this gorgeous card yourself  I’ve listed the supplies, including handy links to my 24/7 shop below:

Product List

SALE-A-BRATION

Don’t forget there is still just over a week left to grab some sale-a-bration freebies.  All you need to do is spend £45 in my online store and you get to chose an exclusive item for FREE!  With time running out fast you’ll be want to be quick.

Speaking of Sale-a-bration and wanting to be quick the clock is also ticking on the fantastic joining offer that we have on.  This offer ends, just like the freebies on the 31st March.  So you might ask what makes this so special and why should you want to join.   I can tell you now this is the best ever offer we have had, in my opinion anyway.  seriously for only £99 you can select products with a retail value of up to £170.  Plus you get free business supplies, but don’t let the word business put you off, I welcome hobby demo’s just as much as business on my team.

Whether you want to earn some extra money or simply get a discount for yourself now simply is the best time to join.  The gorgeous tote bag in the photograph is an additional add on only available to those than join during sale-a-bration.  This bag can be yours for an additional £25, believe me that’s a bargain! If you pick me as your demo you will receive all the help you need both creatively and otherwise to begin your Stampin’ Up! journey.  It really is one you will never regret!  If you are interested in joining my team just click the ‘Join my Team’ button from the home page.

Anyway, enough from me – for now!  I’d love to hear what you think of my new blog and this simple card.  But I guess really it’s always nice to know that we aren’t just talking to ourselves, so please drop me a comment – even just to say hi!  I’ll appreciate it and hopefully knowing you are making me smile will make you smile too!


Have a great day!

Gillian xxx

More butterflies

As promised I’m back to share the remaining three water colour wing projects from my recent class, the one below is a cute and simple little latch card in whisper white, night of navy and wisteria wonder, it’s so simple so so effective.

Isn’t it pretty? When you open the butterfly wings pull through the slot and he sits proudly inside the card. It’s so quick and simple to make… honestly!

Next we embossed a silver gable box and made a cute little tag and double bow… I say we but my ladies hate bows (rather they hate making them) so I was feeling generous and pre-made them… they are so simple, look up fork bows on you tube for lots of clever ideas!

The little butterfly is berry burst which really pops against the silver box, and I cut a second from vellum to give the idea of fluttering wings, a very quick and simple project, and did I mention the box fits two Yankee votive candles perfectly… gorgeous gift for someone.

Our final project of the day was cased from Kim’s Stampin’ spot with a few minor alterations… it features gold embossing and swirly bird for those lovely swirly stamped images behind the butterfly.

For this card I used sweet sugarplum, rich razzleberry and elegant eggplant. I created the background on water colour paper which I wet and them applied layers of the three colours until I was happy with the effect. Make sure the card is super dry before embossing though or you won’t get clear images.

This was such a fun class. We always have a laugh at classes it’s such a great way to make friends and get in some ‘me’ time. If you live locally to me I’d love for you to come along sometime and join the fun, don’t worry if you don’t though just ask me about classes I. The mail…

Anyway time for some Monday afternoon crafting!

Catch you soon

Gillian x

Spring has sprung….

So it seems that springs has sprung…. finally, although I’m quite sure living in Northern Ireland that we haven’t seen the last of the rain!

But isn’t spring wonderful… a sneak peak of promised summer days. Flowers break through the soil, leaves appear on the trees, the days are longer, the birds louder, it’s like we start to live in technicolour and what better symbol for summer than butterflies. So last week my project class was based on water colour wings. Sadly this set and the two sets of co ordinating dies are retiring next month (insert sad face).

My first card is cased from Dena Rekow, I’ve wanted to make one of these style cards for ages and just happened across a STAMPARATUS blog hop… that featured this card and a super quick way to stamp all those beautifully bright butterflies.

The lemon lime twist with basic black is such a strong combo, so striking but the magic really happens when you open the card…

Along with lemon lime twist I used melon mambo, tangerine tango, daffodil delight, pacific point and rich razzleberry. On of the ladies queried how you write on the card, but really this doesn’t wow half as much without the black background so I suggest you get a silver gel pen… perfect!

Another something I’ve been dying to try is my Brusho’s, we haven’t used them in class yet so I had a play before hand and this is the card I came up with.

The base is crushed curry with a dapper denim layer. I used masking tape to hold the watercolour paper onto my mat and then soaked it using an aqua brush before sprinkling on Prussian blue and yellow brusho’s. I spritzed a little more water and sprinkled the brusho until I had a background I was happy with. The butterfly was created using a wash of yellow brusho and then sprinkling a little extra on to give a more textured look. Such fun to play with!

Sticking with the watercolour theme I repeated a technique we did in class a year or more back, it’s messy and wet but guarantees brilliant results and gorgeous effects. For this next card I used rich razzleberry and sweet sugarplum.

See the little yellow blob… that’s what happens if you don’t make sure you’ve cleared up every single speck of yellow brusho… but hey lesson learnt and shared! Isn’t this pretty?

We made another three projects but I don’t want to overwhelm you all at once so please check back again and I’ll share more.

In the meantime enjoy the rest of the bank holiday weekend, tomorrow I’ll be in the craft room playing with ink!

Until next time…

Gillian xx

Waterfront WOW

Despite the ‘new’ Stampin’ Up! Catalogue having been live for three and half months and there now being a newer new one I still hadn’t gotten around to using the waterfront stamp set. To be perfectly honest I think I was a little scared of it. I’ve seen some absolutely jaw dropping designs using it and have just kept putting it off. So it’s sat on the shelf. That is until last week when I dusted off to create a card for my class.

This is cased from another UK demo Amanda Bates (apologies I put in wrong name initially!). I added two extra layers and changed the location and type of sentiment. It’s such a simply stunning card.

I used soft sky, which sadly is retiring soon :(. I also used wisteria wonder (also retiring) along with smoky slate. The birds are from the High Tide stamp set and are stamped in tuxedo black memento. The sentiment came from Bird Banter.

It’s such a beautiful stamp set and I’m so happy it’s staying for at least another twelve months or so and you can guarantee that you will be seeing more makes using it.

I’m the meantime, I’m off to make sure I’m stocked up on all my favourite retiring colours. If you have favourites now is time to buy them before they’re gone.

Have a blessed Saturday.

Gillian x

Exciting news

So the last two weekends have been spent Stampin’ Up! Style…

on 6th April I headed to Telford with Carol, one of my lovely downline to on stage which is a twice yearly convention for Stampin’ Up! Demonstrators.

Friday night I attended centre stage which is special night for demonstrators who are silver Elite and above… as we are celebrating 30 years this year the vending was themed…. eighties style… and I went all permed blond wig and all!

This pic shows my upline team the Stampin’ stars… a bunch of total nutters, but what a night we had… fabulous company, fabulous fun and the best gift ever…. the ALL NEW 2018 STAMPIN’ UP! CATALOGUE.

So this year we are having a colour revamp… a total overhaul of all the colours… Some of my favourites re leaving and some old favourites are returning along with lots of new offerings.. and not only that the ink pads have been redesigned into a nice new compact case, and they are stackable, no more leaning tower of Pisa when you stack your colours!

The new colour range is below:

Have your favourites made the cut?

A big part of the day itself is the opportunity to swap card ideas with other crafters so I went armed with sixty five card fronts and came back with sixty five inspirational projects, cards, three dimensional items… all amazing!

This is my swap –

And as if that wasn’t exciting enough we had meeting of the Northern Belles on 14th, this is a group of demonstrators in Northern Ireland… again we did swaps another 28 great ideas from some very talented women. We had a great day of craic and crafting.

So that’s it from me today, have a great week!

Love Gillian x

What a month!

I have had just a crazy month, thus my absence from here, so BIG apologies, hopefully you follow my Facebook page at Little Things by Gillian and have got some crafty inspiration from there.

I actually started this post – yep the first line, last week and I’m only back here now to try and finish it off!

Firstly my dad had an accident in work a few weeks ago now – we are thankful he still has all his fingers but he had emergency surgery and six weeks of no driving…. it’s time to payback all those lifts he gave me as a teenager!

Then we got a new addition to the family, just the craziest, most energetic and mad little Springer spaniel pup named Otis! He is now ten weeks old and in the three weeks we’ve had him I’ve aged by about five years! Seriously they need more attention than a baby, it’s definitely hard work!

This is him, going crazy in our garden… seriously there are springs concealed in those paws somewhere!

Anywhoo Sale a bration is over and what fun I had… there were some amazing products this year and I can’t quite pick my favourite one.

Although Amazing you is up there at the top… I’m sooooo glad that the thinlet dies are going to make a reappearance in the new annual catalogue. Speaking of the new catalogue this weekend I’m off to Telford to our UK On Stage event – think convention of Stampin’ crazies! One of the perks is I get to get my paws on the brand new catalogue.. I’m beyond excited and delighted to be sharing the experience with one of downline who is travelling over with me. And if that isn’t exciting enough this year I get to go to special event for Silver Elite demonstrators and above, having achieved this title in January – thanks to all my customers and downline I got a special invite last week… it’s 80’s themed to celebrate Stampin’ Up! Turning THIRTY this year so be sure to check back next week when I share some crazy pictures!

Below is another card I’ve made recently – it was for my Mum on Mother’s Day, cased from the talented Eimear Carvill. It again used the free dies from SAB paired with the large letter dies. My mum LOVES purple (even for her eyes) so I went with sweet sugar plum and rich razzleberry which I also happen to love together.

Anyway, forgive me for my absence and I’ll try and keep things more regular as Otis settles in and hopefully let’s me craft in peace!

Hope you all had a blessed Easter, God Bless!

Gillian

Lovely as a tree

Lovely as a tree is just that… lovely. It’s one of, if not the longest standing stamp set from Stampin’ Up! Generally I use it at Christmas with glitter, and lots of it but recently one of the ladies at my class asked for to appear at class to help her come up with other ways to use it.

I love crisp clean images and I also love sponging, I don’t do it too often but always enjoy it when I do. For this card I used low tack masking tape above and below where I wanted the ink. Using a piece of stampin’ sponge I sponged the area with so saffron, before adding a punched circle mask, made from a post it note. Next I sponged using daffodil delight, calypso coral, tangerine tango and then a touch of Cajun craze, I then blended it all with a little more daffodils delight.

My tip to get nice smooth sponging is to start off the page on scrap paper and work in gentle circular movements. Once the sponging was complete I gently peeled off the masking tape. I stamped the image in memento black ink and coloured using the Stampin’ markers in garden green and chocolate chip.

I then cut two thin strip of chocolate chip card and adhered them below the image and finished with a sentiment in chocolate chip, a gold button.

The result is a simply stunning card, ideal for all sorts of occasions not just birthdays. I actually think this would make a perfect sympathy card as well. I’m hoping to find some time to recreate this in alternate colours, what combos do you think would look good… and I should I go outside the box….

So on another note entirely have you been hit but the beast from the east? We’ve had a bit of snow here in Portaferry today, being a coastal town this is unusual especially when other areas haven’t had any…. yet! It’s a weird snow, dry and powdery most unlike our usual wet slush. Beautiful to look at. Especially when you’re inside in front of the fire or sitting in your nicely warmed craft room. By all accounts we are in for a chilly weekend!

If you need any other details on how to complete this project please just drop me a comment below, even if you don’t I’d still love to hear from you.Until next time, stay safe and warm and if you have to go out take care, the roads are treacherous!

God bless.

Gillian x

Product List
Lovely As A Tree Clear-Mount Stamp Set

Lovely As A Tree Wood-Mount Stamp Set

Stamping Sponges

So Saffron Classic Stampin' Pad

Daffodil Delight Classic Stampin' Pad

Calypso Coral Classic Stampin' Pad

Tangerine Tango Classic Stampin' Pad

Cajun Craze Classic Stampin' Pad

Tuxedo Black Memento Ink Pad

Neutrals Stampin' Write Markers

Bird Banter Photopolymer Stamp Set

Clear Block C

Clear Block D

Whisper White A4 Thick Cardstock

Whisper White A4 Card Stock

Chocolate Chip A4 Card Stock

Stampin' Trimmer

True Gentleman Buttons

1-1/4

Regals Stampin' Write Markers